The eXtreme Computer Design Competition 2013

It has been quite some time since I participated in a competition (2010 was the last time @ FSG). I had been waiting for the XCDC2013 and what an amazing experience it was!!!
I learn’t a lot and thoroughly enjoyed the team work. It was like a symphony. Spending hours with my team mates Bharat and Roshan, sprouting new approaches and bouncing ideas off each other. I can never forget that moment when at 2am in the Hunt library we managed to Overclock the Snapdragon S3 (APQ8060) on the MSM8660 (Dragonboard) and there were high fives all around. In this blog post I will try to cover everything what we did/tried for this event. (The Appendix section has all the detailed procedures)
Problem Statement: Optimize the Page load speed of a web browser on the platform previously mentioned. We had to improve both performance and energy efficiency.
Before we begin the optimizations/changes we need to know how to measure the performance and energy efficiency. So, we decided to rely on the following tools:
- Browser benchmarks: Use the benchmarks mentioned here to check page load times for your browser. Okay now go use this link to see which out of Chrome, IE and Firefox is fastest on your PC… No seriously, try it out.
- DDMS/Traceview: Dalvik Debug Monitor Server (DDMS) is accessible via Eclipse and is present in the ADT bundle tools section. It can be used to generate trace logs for applications/processes running on the target device. Use this to determine the costliest sections of the application.
- Perf: The perf tool can be used for recording process activity information. Most of the frequently invoked code is written in native C. This is where perf comes in. The names of functions in perf reports are generated by JNI and they can be correlated with the corresponding “.so” (shared object files) shown in perf report. You can look for these functions in the source code for modifications. Additionally, you may check the hardware counters using perf (if enabled).
- Trepn Profiler: This tool has been designed by Qualcomm to measure effects of an application on the mobile device’s power, data and CPU. The MDP (Mobile development platform) has embedded sensors which are used by trepn to gather the required information and it allows saving all gathered data to a csv file.
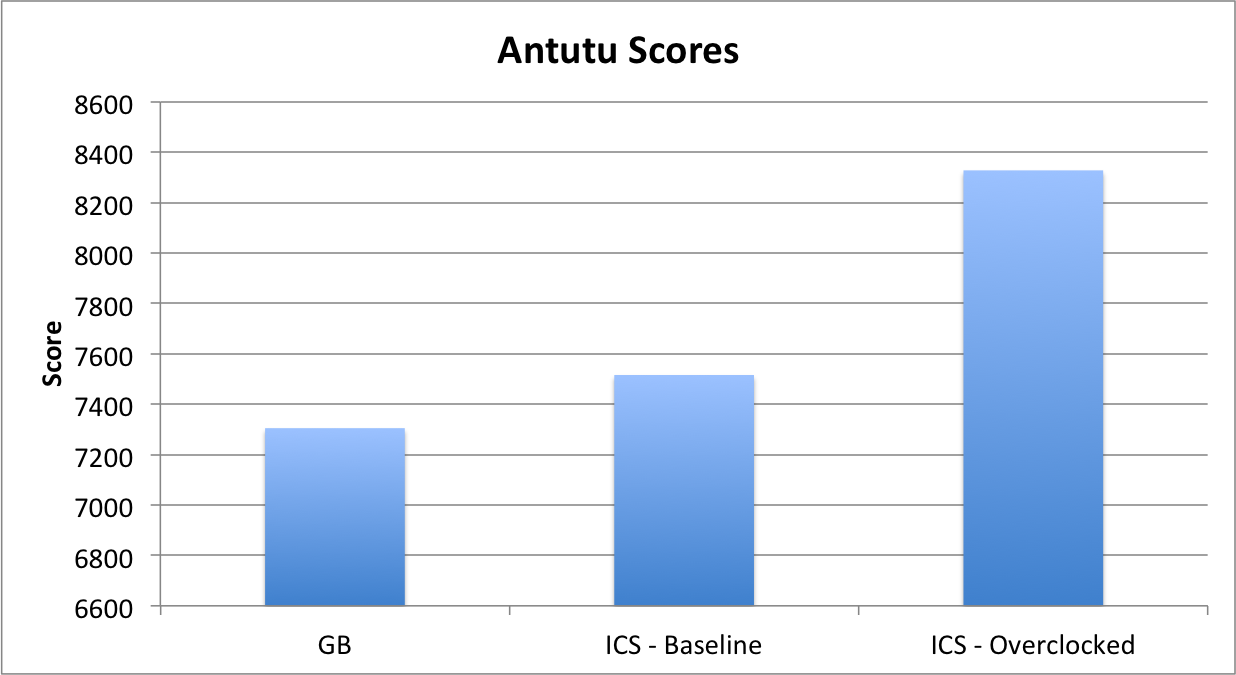
- AnTuTu Benchmark: The AnTuTu benchmark is an android app which gauges performance based on different tests. Though this does not measure browser performance, it is useful to determine general purpose performance.
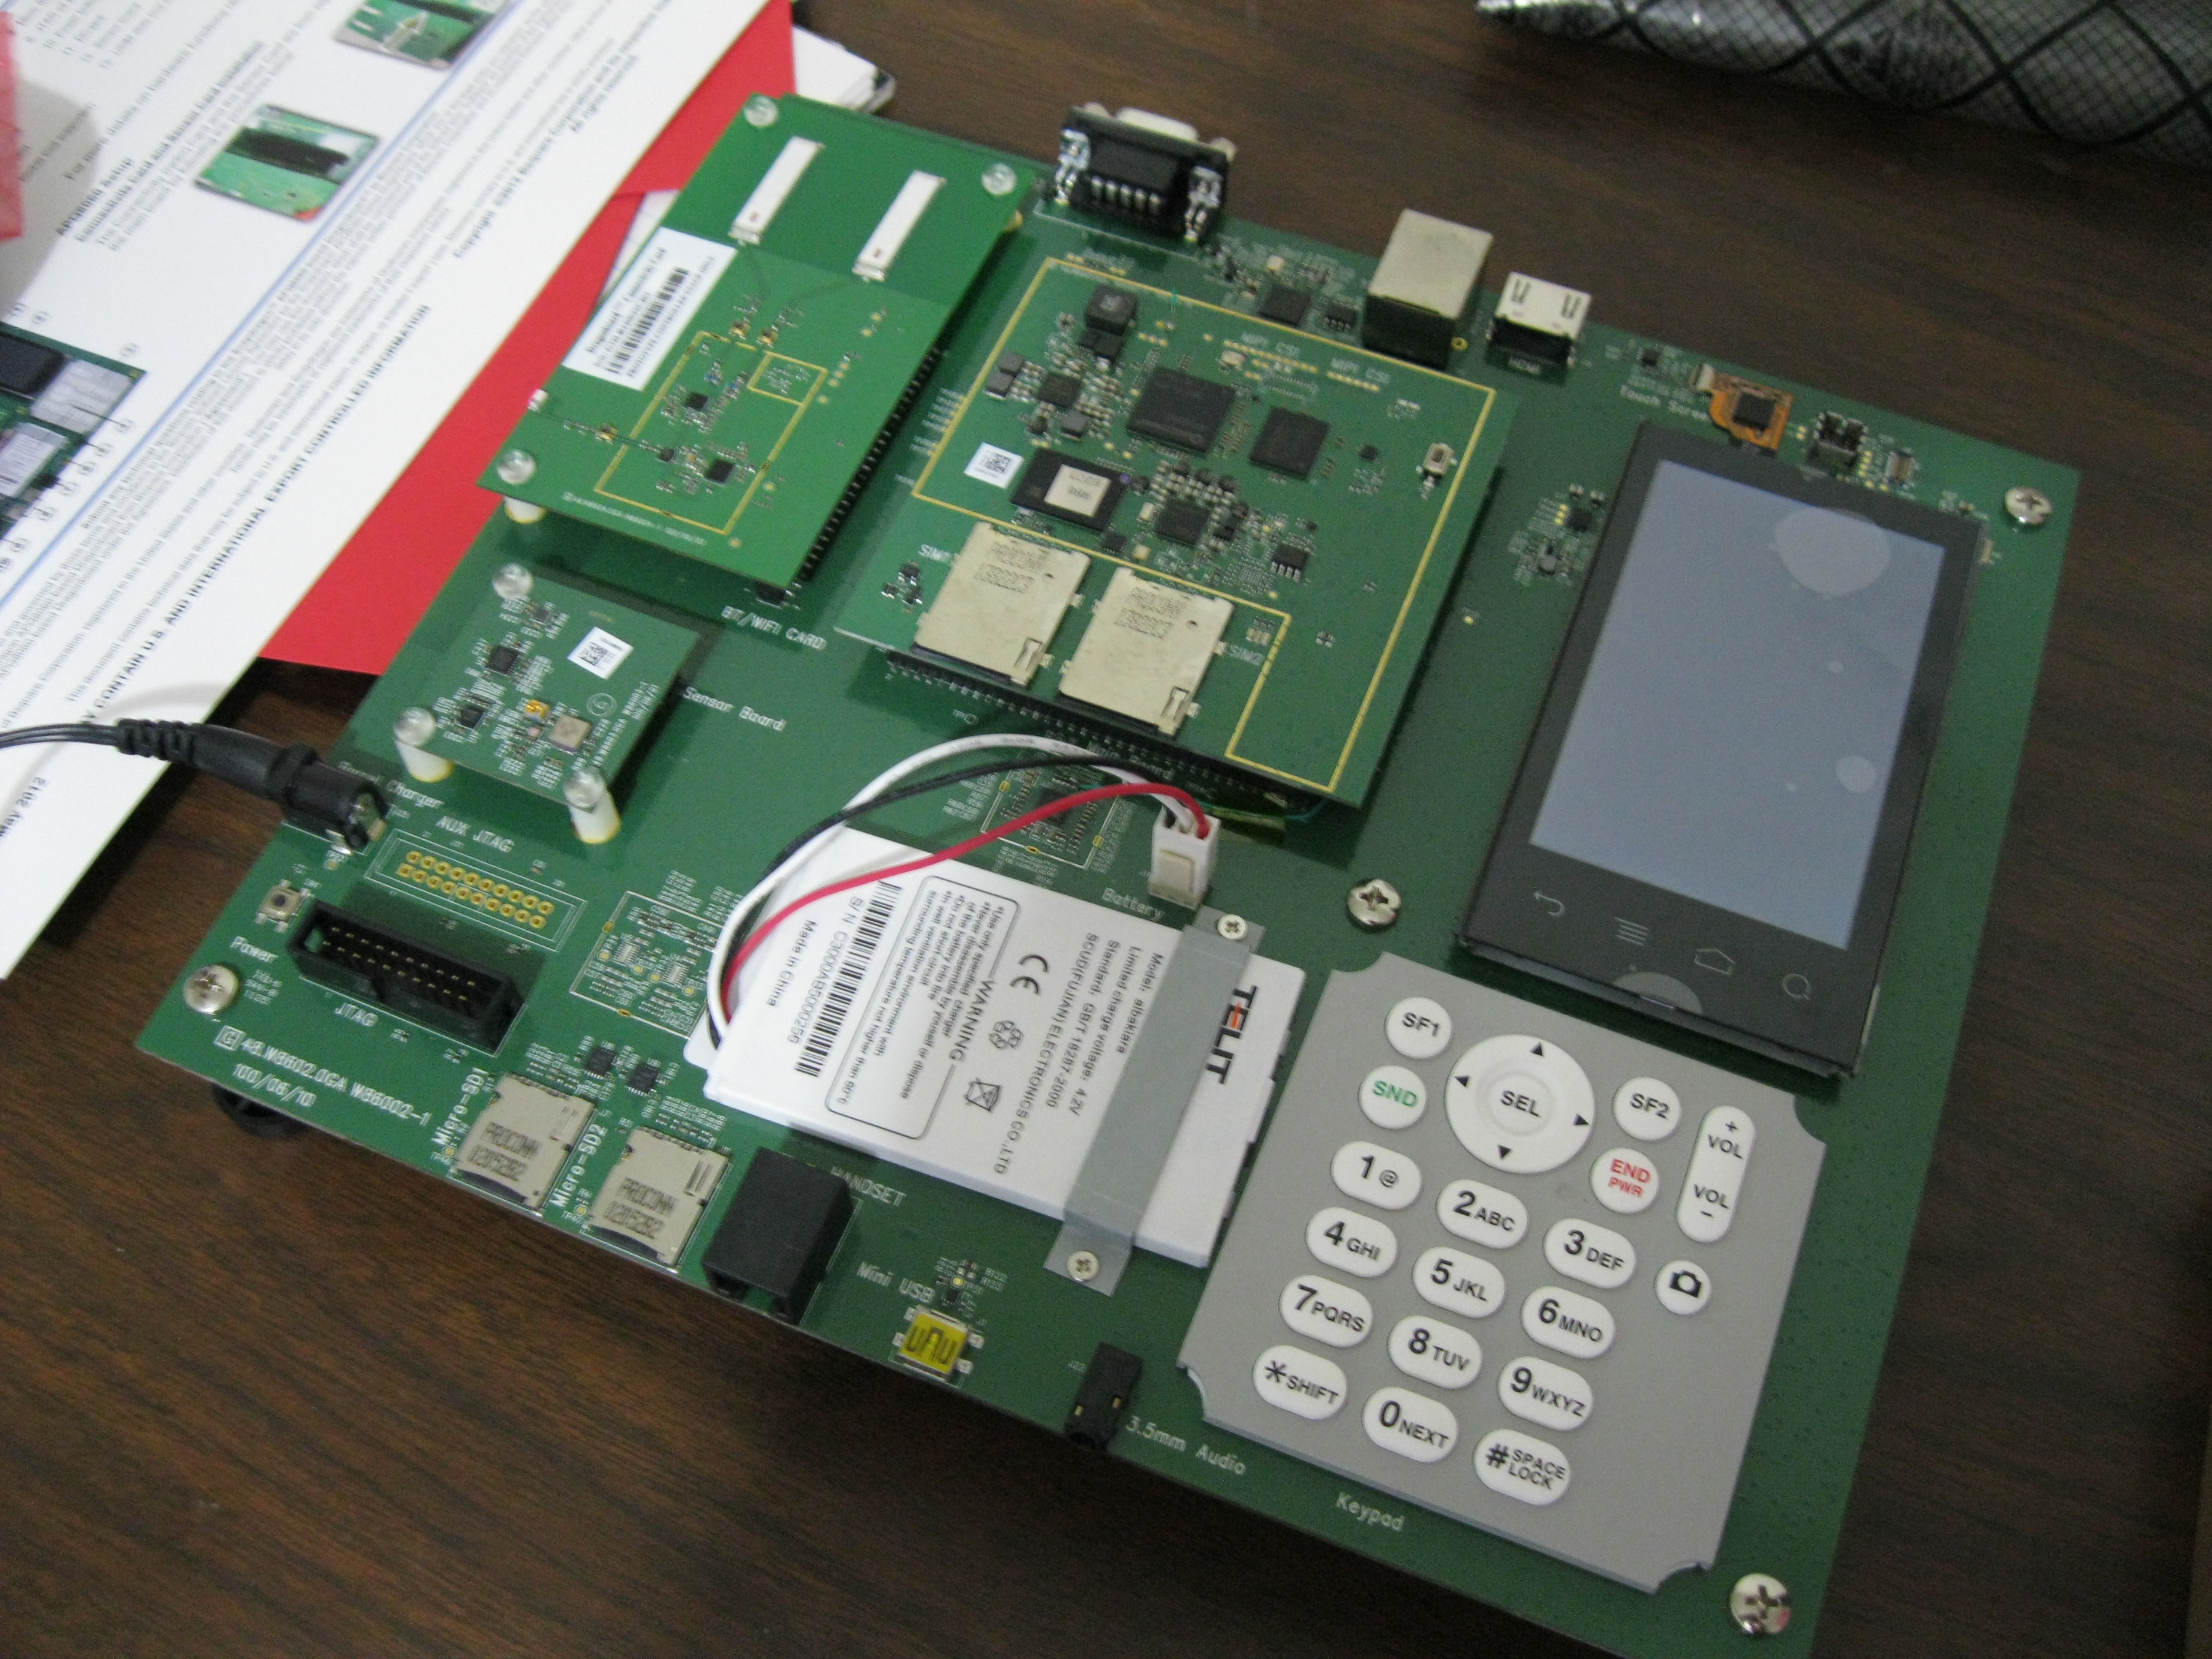
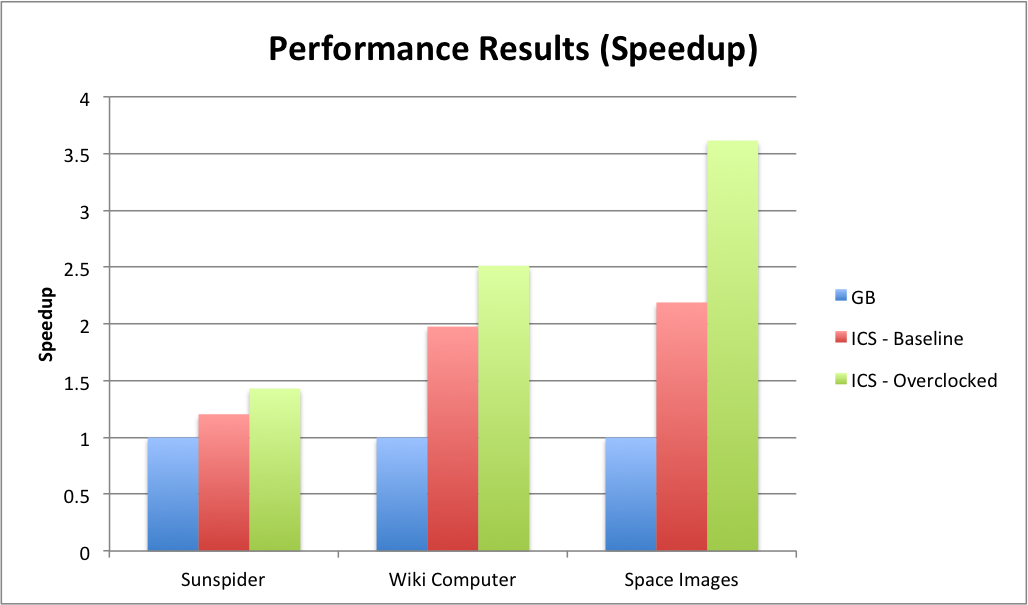
The MDP came with a stock gingerbread image. We ran the stock Android browser through the Profiling procedure and collected data. Next we flashed Ice cream sandwich on the MDP so that we can work on the Browser in the latest Android flavor compatible with the MDP. Then we profiled again to collect baseline data on ICS. Just upgrading to ICS gave a speedup of around 2 (compared to gingerbread baseline). We pulled the ICS source and compiled it ( had some snacks, took a break, fixed some errors…this part over and over again) on 32-bit Ubuntu 12.04 and a MAC OSX 10.8.3.
Now came the interesting part OPTIMIZATIONS!!!
A look at the Sunspider trace collected from DDMS showed that the browser package is nowhere near the costliest sections. The major chunk of time is spent in Timer handling code which belongs to the Webcore package. Time to do a grep in the Kernel source. The outcome: we located frameworks/base/core/java/android/webkit/JWebCoreJavaBridge.java (Note that for all paths hereon we are in the ICS source directory that was pulled) where the method code was present. Then Surpiiissseee, the file is a bridge which provides interface for functions implemented in native C. Okay so now to look for the C code and we ended up at external/webkit/Source/WebKit/android/jni/JavaBridge.cpp . The code is small, the underlying functions are small and offer no avenues for the optimizations we had in mind (removing dependencies, vectorizing code for the Neon SIMD unit). Back to hunting for places to optimize. Next we found the code responsible for triggering shared timers. We reduced the max duration of firing timers at external/webkit/Source/WebCore/platform/ThreadTimers.cpp in the webkit code. This just slowed the benchmarks down and we later figured out that this timer changes the interval at which next computation will be processed by Webkit (details here).
At this point we were going nowhere and just jumping from one function to another to find a small piece of code in every one of them. That’s when Bharat said let’s do kernel modifications. But where would we start? He proposed using a kernel module to overclock the processor (refer this link). (Here is how we set up the needed apps). Well it was a new approach, we thought it’s worth a shot and began compiling the KMOD (makefile here). Locating the kernel source directory and fixing the makefile was another challenge. We pulled Linux kernel and used that directory as source but it asked for configurations. Then we tried default configurations using “make menuconfig” and “make oldconfig”. No luck. A modinfo showed inconsistency in the vermagic. Finally found the exact source directory and did insmod successfully. The MDP rebooted! Tried another set of configurations another reboot and no messages using dmesg or logcat. Finally found kernel messages by doing “cat /proc/kmsg”. The module simply looked for for the voltage setting and replaced any entry in memory that matched the unsigned long value 1250000 with an appropriately different value. There was a illegal memory access which causes the Kernel oops, so we moved the start address for the lookup. Luckily the module got inserted for 1.5GHz setting (max frequency previously was 1.2GHz) and we ran the benchmark. We expected a speedup but instead the performance dropped by half. Maybe there was a mismatch in the L2, RAM and CPU frequency or the module replaced values in some other locations as well which had adverse affects on the system.
Down but not out, we decided to look into the kernel source to find matching functions and located the tables responsible for the clock setup and PLL (kernel/arch/arm/mach-msm/acpuclock-8×60.c). Bingo, went through the code, added entries, compiled and flashed. Checked the MDP. Yes! the changes reflected. Ran the benchmarks. Did it work? See for yourself:


We presented out results and bagged the 3rd spot at the competition. Why not 1st? Well we overclocked the MDP, but then that reduces battery life. The scheduler and high-low frequencies at kernel level have been designed to give the best experience both in terms of performance and energy consumption. So, if we had concentrated more on the browser source (Chrome or Fennec; we did compile source for Fennec which took about 7 hours on my system) maybe the results would have been different. Well, in that case we wouldn’t have overclocked the system right? In short what we did was definitely worth it!
With that ended our attempt at XCDC 2013 !!!
Appendix
Perf based profiling
We used the precompiled perf made available on spencerpages wiki.
- Manually start the browser and note pid using:-
adb shell ps | grep browser - Start the desired web page through adb shell
am start -a android.intent.action.VIEW -d \ http://www.webkit.org/perf/sunspider-0.9.1/sunspider-0.9.1/driver.html \ -n com.android.browser/.BrowserActivity - Steps to initialize ‘perf’
export PERF_PAGER=/system/bin/catfor Gingerbread image use
#: perf record -p
for ICS use (since hardware events not enabled)#: perf record -e cpu-clock -F 500 -p - Run the Benchmark through the device
- When the benchmark run completes, kill ‘perf’ using ‘ctrl+c’
- Note the benchmark result that is being shown on the device
- The collected perf data can be viewed by using the command
perf report
Trepn profiling
- Install Trepn using the instructions provided at the official site.
- After installation, open the Trepn Profiler App and in settings select the parameters that you wish to record. Then select “Profile an app” -> select “Browser”.
- This will open the browser and the profiler will start collecting data.
- Open the various sites that are to be tested using the adb shell.
- After the benchmarks have completed, open Trepn Profiler again and select “Stop Profiling”. At this point, it will ask you whether you want to save the data collected in the current session. The data can be saved as a .csv and ‘pull’ed to your machine for further analysis.
DDMS profiling
- Follow the next few steps just to make sure that you are monitoring the correct method using DDMS.
- Start the browser
- Check PID using
adb shell ps - Look for the same PID in the DDMS ‘Device’ tab.
- This is the method (Browser) you will be profiling.
- Click on “Start method profiling”.
- Run the benchmarks.
- Click on “Stop method profiling”.
- This opens traceview which shows the ‘Exclusive’ and ‘Inclusive’ execution time of each method in the browser.
- This trace file can be saved for later reference.
Flash ICS stock image provided by Bsquare using Windows7
Refer procedure here with the following changes:
After downloading ADT bundle start SDKManager.exe. It should load android sdk manager and show Install 1 package. Click install.
Usb driver will be installed in adt-bundle-windows-x86-20130219\sdk\extras\google\usb_driver The folder .android is not in “documents and settings”. It is in C:\Users\.android adb has moved to platform-tools.
Making Android Stock browser modifications
Once you have the source you may make changes and recompile source, then flash images or alternatively:
Pull stock browser for backup
adb pull /system/app/Browser.apk
Remove/Uninstall the stock browser using:
adb remount
adb shell rm /system/app/Browser.apk
Do “adb reboot” Install your browser using:
cd APQ8060_ICS/out/target/product/msm8660_surf/system/app
adb push ./Browser.apk /system/app/
Profiling sunspider with DDMS/traceview will show major chunk on time being spent in sharedTimerFired which belongs in webkit package. The WebKit Java Bridge is in frameworks/base/core/java/android/webkit/Jwebcorejavabridge and in external/webkit/Source/WebKit/android/jni/JavaBridge.cpp. Changes to the timers are in external/webkit/Source/WebCore/platform/ThreadTimers.cpp.
The libraries, once compiled, will be found in out/target/product/msm8660_surf/system/lib. The perf tool showed major time being used by libv8.so and libwebcore.so. But a “ls -la” in the above directory shows libwebcore.so being updated after making changes to shared timer code. Hence push this file to /system/lib and also push the app Browser.apk
Makefile to compile KMOD for Android ICS source
KERNEL_BUILD := out/target/product/msm8660_surf/obj/KERNEL_OBJ/
KERNEL_CROSS_COMPILE := prebuilt/darwin-x86/toolchain/arm-eabi-4.4.3/bin/arm-eabi-

obj-m += 8x60_oc.o

all:
	make -C $(KERNEL_BUILD) ARCH=arm CROSS_COMPILE=$(KERNEL_CROSS_COMPILE) M=$(PWD) modules

clean:
	make -C $(KERNEL_BUILD) M=$(PWD) clean 2> /dev/null
	rm -f modules.order *~
Monitor Kernel oops
adb shell
cat /proc/kmsg
Reboot in fastboot if MDP refuses to boot up
Disconnect all power and keep the 5 key pressed when you connect the power. Do “fastboot devices” to check for the MDP.
Permitting apps to use root
Download SuperSU (the broker app which allows user apps to gain root access)
wget http://download.chainfire.eu/315/SuperSU/UPDATE-SuperSU-v1.25.zip
Extract the zip file. Push the Superuser.apk to /system/app
adb push Superuser.apk /system/app
Push the su binary to /system/bin
adb push su /system/bin
Make the binary owned by root
adb shell chown 0.0 /system/bin/su
Make the binary executable, setuid, and setgid
adb shell chmod 6755 /system/bin/su
Reboot the phone
adb reboot
Start SuperSU from the launcher
Launch SetCPU app and grant it su permissions. Then use it to increase CPU frequency or alternatively use:
adb shell
echo "performance" > /sys/devices/system/cpu/cpu0/cpufreq/scaling_governor
Mount NTFS filesystem on Ubuntu with read-write/execution permissions (In case you wish to compile on external drive)
Insert/mount your do “sudo blkid” and note the device file for your disk “/dev/sdc1” (in my case). unmount the disk
sudo mkdir /media/harddisk
sudo mount -t ntfs -o fmask=0022,dmask=0000,uid=1000,gid=1000 /dev/sdc1 /media/harddisk
Compiling ICS from source
Follow all of the steps mentioned here. Specifically the ones under Branch 4.0.x and previous since you will be compiling ICS.
Also follow the steps given at Spencerpages (do not use the fixes mentioned for errors in case you are on MAC)
We managed to compile the ICS source on two different platforms, Ubuntu 12.04 LTS (32-bit) and Mac OS X (10.8.3).
Compile Android ICS on Ubuntu 12.04 LTS (32-bit)
Changes specific to Ubuntu 12.04 LTS (32-bit) are as follows: After the Step 8 mentioned in “ Recreating the Ice Cream Sandwich” section in spencer pages, you might encounter the following errors:
Error occurred during initialization of VM
make: *** [out/target/common/obj/JAVA_LIBRARIES/core_intermediates/noproguard.classes-with-local.dex] Error 1
OR
Could not create the Java virtual machine.
ERROR: signapk.jar failed: return code 1
make: *** [out/target/product/msm8660_surf/msm8660_surf-ota-eng.falcon.zip] Error 1
Fix:
Modify build/core/definitions.mk. On Line 1528 change Xmx to 1024M
$(if $(findstring windows,$(HOST_OS)),,-JXms16M -JXmx1024M)
In build/tools/releasetools/common.py change Xmx2048m to Xmx1024m at all occurrences
Compile Android ICS on Mac OS X (10.8.3)
The changes specific to compiling on OS X and those not presented in the two links at the top are mentioned here:
- Grab the Mac OS X 10.5 SDK. Most of the tools that are required will be installed when you grab the latest version of Xcode that is available. Also, do install the “Command Line Tools” from within Xcode. For the 10.5 SDK, you need to register as an Apple Developer and Download an older version of Xcode that has the 10.5 SDK. To add the SDK, I re-installed the MacOSX10.5.pkg from the Xcode 3.2.6 download. It is in a hidden folder named “Packages” on the disk image. After mounting the .dmg file, you can open it from the command line with open /Volumes/Xcode\ and\ iOS\ SDK/Packages/. When installing the package, choose change install location and option-click on the drive you want to install to, so that you can specify a folder. The target folder should be /Developer or the base of your Xcode 4 install if you have put it in a non-standard location.
- Get the “real” gcc. You’ll get a llvm version of gcc with the Xcode Command Line tools install. But that doesn’t seem to like Cross Compilation too much. So, I would suggest get a gcc through macports and make it your default. I used gcc 4.7.
- Errors and their specific fixes:
Error:/external/elfutils/config-compat-darwin.h:42: error: static declaration of ‘strnlen’ follows non-static declaration /usr/include/string.h:143: error: previous declaration of ‘strnlen’ was here In file included from :0:Fix: In external/elfutils/config-compat-darwin.h, the following built-in gcc preprocessor macro should take care of the strnlen redefinition problem from /usr/include/string.h on OS X >= 10.7.
 #if __ENVIRONMENT_MAC_OS_X_VERSION_MIN_REQUIRED__ < 1070
 static inline strneln(…) …
 #endif
Error:
make: *** [out/host/darwin-x86/obj/EXECUTABLES/qemu-android-x86_intermediates/qemu-android-x86] Error 1Fix: Commenting out all lines in external/qemu/Android.mk
Error:host Executable: sqlite3 (out/host/darwin-x86/obj/EXECUTABLES/sqlite3_intermediates/sqlite3) Undefined symbols for architecture i386: “_sqlite3_androidopt_handle_pragma”, referenced from: _sqlite3Pragma in sqlite3.o _sqlite3Pragma in sqlite3.o “_sqlite3_androidopt_open”, referenced from: _openDatabase in sqlite3.o _openDatabase in sqlite3.o ld: symbol(s) not found for architecture i386 collect2: ld returned 1 exit status make: *** [out/host/darwin-x86/obj/EXECUTABLES/sqlite3_intermediates/sqlite3] Error 1Fix: Patch the file android.mk using the patch attached. Android.mk is present in the folder external/sqlite/dist/Android.mk
Error:Context*, void const*, unsigned long)in libRS.a(rsgApiReplay.o) ld: symbol(s) not found for architecture i386 collect2: ld returned 1 exit status make: *** [out/host/darwin-x86/obj/EXECUTABLES/a3dconvert_intermediates/a3dconvert] Error 1Fix: Patch the rsAllocation.cpp file using the supplied patch. rsAllocation.cpp is present in the folder frameworks/base/libs/rs/rsAllocation.cpp
Error: elf.h file not found in two files- APQ8060_ICS/kernel/scripts/mod/mk_elfconfig.c:4:17: fatal error: elf.h: No such file or directory
- APQ8060_ICS/kernel/scripts/mod/modpost.h:10:17: fatal error: elf.h: No such file or directory
Fix: Follow Elefant – http://blog.csdn.net/elefant/article/details/7698586
Manually download elf.h from http://www.rockbox.org/tracker/9006?getfile=16683
Place it in the directory “kernel/scripts/mod” Include the correct header file in the two files mk_elfconfig.c and modpost.h. Do include “elf.h” instead of <elh.h>